trystack.org is a easiest and fastest way to understand openstack, a open source cloud software.
Request for a free account on trystack.org. Once you have the acount, you can start using the openstack dashboard, cURL and Nova Client to launch Server Instances (VMs), reboot VMs, terminate VMs etc.
In this blog, I will explain how to use the openstack Dashboard and Nova Client to launch VMs and then SSH to the VM
The first part of the blog explains the Dashboard and the second part of this blog explains Nova Client. Following the steps mentioned in this blog, you should be able to launch VMs using Dashboard and Nova Client.
Dashboard
Once you login to trystack, you are presented with your dashboard which looks like this

We shall now follow the below mentioned steps and launch a VM using Dashboard
1. Modify Security-Groups
This is done by editing the default security group or adding a new security group. For ease of understanding, lets modify the default security group.

Select IP protocol tcp and enter 22 in "From port" and "To port " and Cidr 0.0.0.0./0. This opens port 22 for requests from any IP
Select IP protocol icmp and enter -1 in "From port" and "To port " and Cidr 0.0.0.0./0. This allows ping from any IP
2. Adding Key-pair
Next lets add a keypair. Once you add a keypair, the public key would be downloaded.
 Once this is done, we are all set to launch a VM.
3. Launching VM
Click Images and launch a required VM from a list of images available.

Click launch on the required image

Select the flavor m1.small and the keypair you just added and click launch. This will launch a VM

Once the status is "Active", the VM is launched and we can ping and SSH to the IP
4. Accessing the VM
Now lets SSH to this new VM using the commands
sagar@ubuntu:~$ chmod 600 public-key-file
sagar@ubuntu:~$ ssh -i public-key-file ubuntu@IP Address of VM
The default username of the VM launched is "ubuntu"
 If you are using windows, you can use putty to SSH to your VM
Nova Client
Now let me explain you how to use Nova Client to launch a VM. We will perform the same operations as done in Dashboard using Nova Client.
First you need install Nova Client on your machine. This can be done using the following command
$ pip install -e git+https://github.com/openstack/python-novaclient.git#egg=python-novaclient
This will install Nova Client. You can check the installation by entering
$ nova help
Once this is done, you can start using Nova Client and launch a VM.
1. Setup env variable
Set the following values in env
export NOVA_USERNAME=myuserid
export NOVA_API_KEY=mypassword
export NOVA_PROJECT_ID=myuserid
export NOVA_URL=http://trystack.org:5000/v2.0
export NOVA_VERSION=1.1
myuserid and mypassword are the credentials you use to login to trystack.org
2. Modify Security-Groups
3. Adding Key-pair
Lets first set up the KeyPair (You can use the same KeyPair as created in Dashboard also)
Executing the following command will return all the keypairs
sagar@ubuntu:~$ nova keypair-list

For launching a VM, you can use one of the keypairs already available or create a new one and use it.
A keypair can be created using the command
sagar@ubuntu:~$ nova keypair-add SagarKey5 >SagarKey5.pem

For launching a VM, we will need the flavor. This can be got using the command
sagar@ubuntu:~$ nova flavor-list

Lets use the image oneiric-server-cloudimg-amd65 (ID=15) , flavor m1.small (ID=2) and keypair that was added using nova keypair-add
The VM can be launched using the command
sagar@ubuntu:~$ nova boot --image 15 --flavor 2 --key_name SagarKey5 SagarVM6
The VM name I have given is "SagarVM6". You can provide the name as required.

The VM is now in BUILD state. Once it is in active state, it will be available for us to SSH
The state of the instances can be got using the command
sagar@ubuntu:~$ nova list

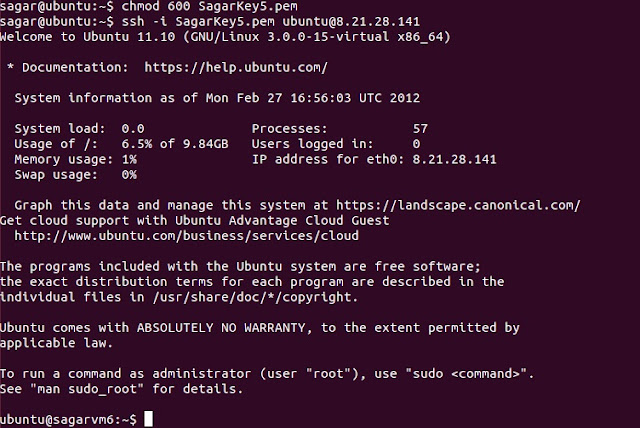
The instance SagarVM6 has been launched with IP Address 8.21.28.141.
5. Accessing the VM
Now lets SSH to this new VM using the commands
sagar@ubuntu:~$ chmod 600 public-key-file
sagar@ubuntu:~$ ssh -i public-key-file ubuntu@IP Address of VM
The default username of the VM launched is "ubuntu"
At the end of these steps you should be able to launch VMs in trystack.org using both Dashboard and Nova Client
Request for a free account on trystack.org. Once you have the acount, you can start using the openstack dashboard, cURL and Nova Client to launch Server Instances (VMs), reboot VMs, terminate VMs etc.
In this blog, I will explain how to use the openstack Dashboard and Nova Client to launch VMs and then SSH to the VM
The first part of the blog explains the Dashboard and the second part of this blog explains Nova Client. Following the steps mentioned in this blog, you should be able to launch VMs using Dashboard and Nova Client.
Dashboard
Once you login to trystack, you are presented with your dashboard which looks like this

We shall now follow the below mentioned steps and launch a VM using Dashboard
1. Modify Security-Groups
Before launching a VM, lets first modify the Security Groups rules to allow us to ping and SSH to the VMs.
This is done by editing the default security group or adding a new security group. For ease of understanding, lets modify the default security group.

Select IP protocol tcp and enter 22 in "From port" and "To port " and Cidr 0.0.0.0./0. This opens port 22 for requests from any IP
Select IP protocol icmp and enter -1 in "From port" and "To port " and Cidr 0.0.0.0./0. This allows ping from any IP
2. Adding Key-pair
Next lets add a keypair. Once you add a keypair, the public key would be downloaded.

3. Launching VM
Click Images and launch a required VM from a list of images available.

Click launch on the required image

Select the flavor m1.small and the keypair you just added and click launch. This will launch a VM

Once the status is "Active", the VM is launched and we can ping and SSH to the IP
4. Accessing the VM
Now lets SSH to this new VM using the commands
sagar@ubuntu:~$ chmod 600 public-key-file
sagar@ubuntu:~$ ssh -i public-key-file ubuntu@IP Address of VM
The default username of the VM launched is "ubuntu"

Nova Client
Now let me explain you how to use Nova Client to launch a VM. We will perform the same operations as done in Dashboard using Nova Client.
First you need install Nova Client on your machine. This can be done using the following command
$ pip install -e git+https://github.com/openstack/python-novaclient.git#egg=python-novaclient
This will install Nova Client. You can check the installation by entering
$ nova help
Once this is done, you can start using Nova Client and launch a VM.
1. Setup env variable
Set the following values in env
export NOVA_USERNAME=myuserid
export NOVA_API_KEY=mypassword
export NOVA_PROJECT_ID=myuserid
export NOVA_URL=http://trystack.org:5000/v2.0
export NOVA_VERSION=1.1
myuserid and mypassword are the credentials you use to login to trystack.org
2. Modify Security-Groups
Now let me explain how to modify Security Groups. If you have already done it using Dashboard, skip this step.
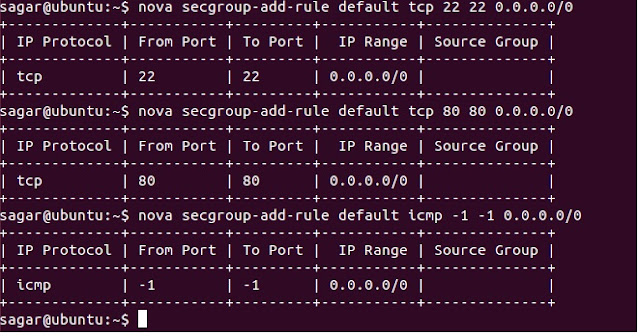
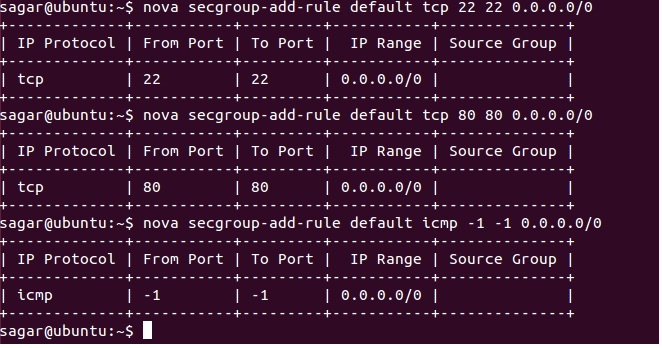
We will need to open ports for ping and SSH for the default security group using commands
sagar@ubuntu:~$ nova secgroup-add-rule default tcp 22 22 0.0.0.0/0
sagar@ubuntu:~$ nova secgroup-add-rule default icmp -1 -1 0.0.0.0/0
We will need to open ports for ping and SSH for the default security group using commands
sagar@ubuntu:~$ nova secgroup-add-rule default tcp 22 22 0.0.0.0/0
sagar@ubuntu:~$ nova secgroup-add-rule default icmp -1 -1 0.0.0.0/0
3. Adding Key-pair
Lets first set up the KeyPair (You can use the same KeyPair as created in Dashboard also)
Executing the following command will return all the keypairs
sagar@ubuntu:~$ nova keypair-list

A keypair can be created using the command
sagar@ubuntu:~$ nova keypair-add SagarKey5 >SagarKey5.pem
The public key is now saved to a pem file SagarKey5.pem
4. Launching VM
We are now ready to launch the VM. A VM can be launched using a image available in the image service.
The list of available images can be retrieved using the command
sagar@ubuntu:~$ nova image-list
sagar@ubuntu:~$ nova image-list

For launching a VM, we will need the flavor. This can be got using the command
sagar@ubuntu:~$ nova flavor-list

Lets use the image oneiric-server-cloudimg-amd65 (ID=15) , flavor m1.small (ID=2) and keypair that was added using nova keypair-add
The VM can be launched using the command
sagar@ubuntu:~$ nova boot --image 15 --flavor 2 --key_name SagarKey5 SagarVM6
The VM name I have given is "SagarVM6". You can provide the name as required.

The VM is now in BUILD state. Once it is in active state, it will be available for us to SSH
The state of the instances can be got using the command
sagar@ubuntu:~$ nova list

The instance SagarVM6 has been launched with IP Address 8.21.28.141.
5. Accessing the VM
Now lets SSH to this new VM using the commands
sagar@ubuntu:~$ chmod 600 public-key-file
sagar@ubuntu:~$ ssh -i public-key-file ubuntu@IP Address of VM
The default username of the VM launched is "ubuntu"

At the end of these steps you should be able to launch VMs in trystack.org using both Dashboard and Nova Client
No comments:
Post a Comment